Website Maintenance
This page will walk you through how to build and maintain the website.
Overview
This website is built using next.js with mostly typscript, and MDX for the page content. It is built of a template called Nextra (opens in a new tab). The website is hosted on Vercel (opens in a new tab). These come with a lot of functionality out of the box and almost zero actual maintance needs to be done. This page will focus on how to build and deploy this site. And make changes like adding or removing pages and content.
Tutorial Objectives
- Fork the repo.
- Clone the repo to your computer.
- Deploy your forked repo to vercel.
- Make changes to the website.
- Add/remove new pages to the website.
- Add collaborators to the website.
Limitations
This tutorial is not an indepth guide on web development, it is meant ot give the specific information you need.
Other Resources
- React (opens in a new tab)
- next.js (opens in a new tab)
- Vercel (opens in a new tab)
- MDX (opens in a new tab)
Prerequisites
You will need to have a github account and a vercel account (If you are building the website). You will also need to have git installed on your computer. And it is assumed you know how to use the terminal/command line.
To make a github account go to github.com (opens in a new tab) and follow the instructions.
(If building and deploying) Similarly to make a vercel account go to vercel.com (opens in a new tab) and follow the instructions.
They are both free to use for personal accounts.
Tutorial
Part 1: Forking / Cloning / and Deploying the repo
Forking the repo
First you will need to fork the repo. This will create a copy of the repo in your github account.
Make sure you are logged in to your github account. Then go to the repo (opens in a new tab) (This is the original repo you may need to fork a different one).
Now click on the fork button in the top right corner.

It will then prompt you to make the name of your forked repo. You can leave it as the default or change it to something else. Then click the Create fork button. Thats it! You now have a copy of the repo in your github account.
Clone the repo
Now you need to clone your new forked repo to your computer. This will download the repo to your computer so you can make changes to it.
This is very simple just open a terminal and navigate to the folder you want to download the repo to. Then run the following command.
git clone https://github.com/your-username/example-repo.git
cd example-repoReplace your-username with your github username and example-repo with the name of your forked repo.
To make it easier you can click on the Code button in the top right corner of your forked repo and copy the link from there.
Deploying the website
Now you need to deploy the website. This will make it live on the internet. This is done using vercel. If you are not deploying the website you can skip this step.
First you need to make a vercel account. Go to vercel.com (opens in a new tab) and follow the instructions.
Once you have made an account go to the vercel dashboard (opens in a new tab) and click on the Add New drop down menu and select Project.

If you havent yet add your github account to vercel by clicking the drop down menu, and select + Add GitHub Account. Then follow the instructions.
Now you should see your forked repo in the list. Click on Import.
You can now make the name you want for the project. You can leave it as the default or change it to something else. Then click the Deploy button.
That's it! You now have a live website. You can click on the Visit button to see it.
Part 2: Making changes to the website
The website is designed for easy updates, including adding or removing pages and content. You'll find all the pages in the pages folder and images in the public/images folder. Want to add videos? Use the custom function for YouTube videos: <Yvideo video={{src: 'pfgycNLuD78', title: 'MOLLER: Part 4'}} />. Just put the video's link suffix in the src: field and the title in the title: field. You can also add images from the public folder with <Image src="/images/webdev/web_02.png" width="600" height="400" />. Specify the image path in src: and set the dimensions with width: and height:.
If you have trouble with the aspect ratio of the image you can something like instead.
<div style={{ display: 'flex', justifyContent: 'center' }}>
  <img src="/images/folder/image.png" alt="Webdev Image" style={{ width: 'auto', height: '600px' }} />
</div>
Let's go over the files structure of the website. In the repo you will see a folder called pages. This is where all the pages of the website are stored.
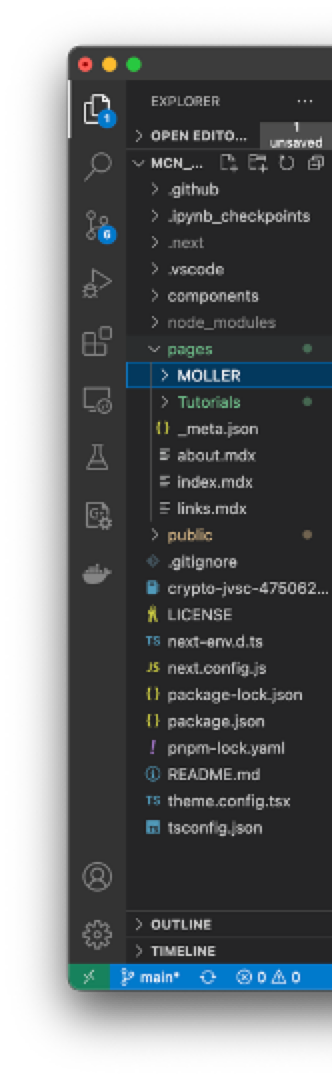
You can see here we have two folders (MOLLER and Tutorials) and several MDX files. Each page is a .mdx file. This is a file format that allows you to write markdown and react code in the same file. You can read more about it here (opens in a new tab). You can also ues straight html if you are more comfortable with that. There is a lot of flexibility in these files.
Lets look at the MOLLER experiment MDX open the MOLLER folder and select MOLLER.mdx file. You should see something like this.

You can see it is written in markdown with a mix of html and some tsx (a kind of typscript used in react). At the top of every page make sure you have all of the imports you need.
Let's practice using mdx by adding a page.
Adding/removing a page
open a new terminal and navigate to the folder where you cloned the repo. Then run the following command.
npm run dev
This will locally host the website. Now open up a browser window and go to localhost:3000. You should see the website.

Open the folder in a a text editor of your choice. Now go to the pages directiory and add a file called test.mdx. In the file add the following code.
---
title: 'Test'
description: 'Test Page'
---

import { Tab, Tabs } from 'nextra-theme-docs'
import Video from '@/components/video'
import Image from 'next/image'
import { Callout } from 'nextra-theme-docs'
Save your changes now go to the browser and click on the MOLLER/ShowerMax link, you should see this.

Our test page was added to the list. Go ahead and click on it. It should be a blank page. But if you look at the tab, you can see the title we gave it is what appears at acroos the tab and at the top of the page.
Let's add some content. In the test.mdx file add the following code.
# Test Page

This is a test page.

## this is a subheading

This is a paragraph.


This is an image.
<Image src="/images/webdev/web_02.png" width="600" height="400" />
Save your changes and make sure the cahnges are reflected in the browser. You should see something like this.

So we have added a page and some content but you may notice that the page name is showing up in the side bar no matter where we are on the website. This is because we didn't add it to the _meta.json file. Every folder has it own _meta.json file. This file is used to generate the side bar. Open the _meta.json file in the pages folder and add the following code.
"links": {
    "title": "Links ↗",
    "type": "page"
  },

    "test": {
        "title": "Test",
        "type": "page"
    }
You can see now we have added it the navigation bar and it doesnt appear in every part of the website anymore.

This is the basic idea of how to add a page to the website. You can add as many pages as you want. You can also add subfolders and pages inside of those folders. Make sure you add the pages to the _meta.json file in the folder where you want it to appear. And if you add a new folder make sure you add it to the _meta.json file in the parent folder, and make a new _meta.json file in the new folder.
If we wanted to make a new folder out of the test.mdx for example we would have made a new directory in the pages folder, then added the directory name to the _meta.json file in the pages folder. Then we would have added a _meta.json file in the new directory and added the test page to that file. And the test.mdx would also be in the new directory.
Removing the page is just as easy. Just delete the page from the _meta.json file and delete the .mdx file.
Push changes to the repo
Once you have made your changes you will need to either push your changes to your repo, or make a pull request. To do this run the following command in the terminal.
git add . # this adds all of the changes you made to the repo
git commit -m "your commit message" # this commits the changes to the repo
git push # this pushes the changes to the repo
Vercel automatically deploys the website when you push to the repo. So once you push your changes you can go to vercel and see them. If you are satisfied with the changes you can promote the new version to production on vercel.
Promoting to production
However if you make changes to the page structure like we just did you will need to redeploy the website. To do this go to the vercel dashboard and click on the website. Then click on the deployments tab. You should see something like this.

Click on the latest deployment. You should see something like this.

Click on the three dots next to the visit button.

And select Redeploy.
If you are satisfied with the changes you can promote the new version to production on vercel. You can do this by clicking the same three dots and selecting Promote to Production.
Thats it! You have now made changes to the website and deployed them.
Part 3: Adding Collaborators to a GitHub Repo
Adding collaborators to your GitHub repo allows other users to have direct access to your repository, enabling them to push changes, review code, and manage issues. To add collaborators to your GitHub repo, follow these steps:
Go to the main page of your GitHub repo, and click on the Settings tab.

In the left sidebar, click on Collaborators.

Click on the green Add People button.

In the search field, enter the GitHub username or email address of the person you want to invite as a collaborator, then click on the correct name from the search results.
Select the appropriate permission level for the collaborator. The default permission level is Write, which allows the collaborator to push changes to the repo. Other permission levels include Read, which only allows viewing and pulling the repo, and Maintain, which grants additional privileges such as managing issues and pull requests.
Wrap up
In this tutorial, we covered how to fork, clone, and deploy a website using Next.js, TypeScript, MDX, and Vercel. We also went through the process of making changes to the website, adding and removing pages, and pushing changes to the repo. Lastly, we demonstrated how to redeploy the website and promote it to production using Vercel.
By following the steps outlined in this tutorial, you should now have a solid understanding of how to maintain and update the website. Remember that this tutorial is not an in-depth guide on web development, but rather a specific introduction to managing this particular website.
As you continue to work on the website, you may need to explore additional resources to further your understanding of web development concepts. Please refer to the Other resources section for a list of helpful links.